
Click any of the flowchart blocks for a more detailed explanation.

It is very important to find out if the disk is physically unhealthy before starting a recovery or repair.
If you find significant indications that the drive may have some physical damage then all of your efforts need to focus on quickly and gently making an exact copy of the drive. The reason for this is that hard drives are rarely just kind of broken. They are usually continually breaking once they start having physical problems.
Choose Windows
If the drive is connected to a computer that can run Windows without depending on the problematic drive then the health of the drive can be checked without having to boot the computer with an alternate operating system.
Choose Linux
If the problematic drive is preventing Windows from booting/running or the drive is detected by the computer's BIOS(seen when the computer first powers on) but does not appear in the Windows operating system. A boot CD or USB key can be used to boot the computer into the Linux operating system. Linux often allows a more direct access to the hard drive than Windows.
There are several free programs that can allow you to access a hard drive's S.M.A.R.T. data to help you determine if there is physical damage to the drive. Some examples include...
GSmartControl
HDDScan
S.M.A.R.T. stands for Self-Monitoring, Analysis and Reporting Technology. The S.M.A.R.T. data are diagnostics records that are stored in chips on the hard drive. It runs tests and maintenance tasks to both make the drive run better and to alert the user when the drive is starting to show signs of a potential impending failure.
The S.M.A.R.T. data that you want to pay close attention to are...
- The Raw Value of S.M.A.R.T. attribute 5 Reallocated Sector Count
- The Raw Value of S.M.A.R.T. attribute 197 Current Pending Sector Count (sometimes listed as C5 instead of 197)
- Whether or not the drive passes the S.M.A.R.T. Offline Short Self Test (do not run the Long Test at this time as it can stress the drive if it is damaged)
Next check the partition structure of the disk by viewing it in the Disk Management window.
Click START, right-click MY COMPUTER (COMPUTER in Win7/Vista) and select MANAGE.
In the left pane select DISK MANAGEMENT.
Look at your disk and see if there are any partitions on it. Is the STATUS healthy? Is the FILE SYSTEM NTFS or FAT32?
If the status is not Healthy then there is probably physical damage. If the FILE SYSTEM is RAW or the drive shows as empty and unallocated then there are probably partition errors. Partition errors don't neccessarily indicate physical damage.
If you need/want to use a Linux boot CD or USB stick to check the drive for damage, I recommend using PartedMagic since it already contains all the tools for checking the drive and for doing repairs and recoveries.
There are step by step instructions for doing this here
What are the signs of physical damage?
The obvious ones are noises. Clicking or beeping sounds originating from within the hard drive. Beyond that it is easier to describe what a drive with no physical damage looks like
The Raw Value of S.M.A.R.T. attribute 5 Reallocated Sector Count is small like 0 - 9 AND the Raw Value of S.M.A.R.T. attribute 197 Current Pending Sector Count is 0 AND it passes the S.M.A.R.T. Offline Short Self Test. Then you are pretty safe assuming that there is no physical damage and your data is either just scrambled or deleted and needs to be unscrambled or undeleted.
If any of those conditions are different then you should assume there is physical damage and act accordingly.
You do not want to write to a drive that you are trying to recover data from because it is possible to overwrite and destroy data that you want to recover.
Even though the drive appears to be physically healthy, you still need a separate drive to copy recovered files to (Unless all that is needed is a partition table or boot sector repair. Then you'll be able to use your drive right away without having to recover any files.)
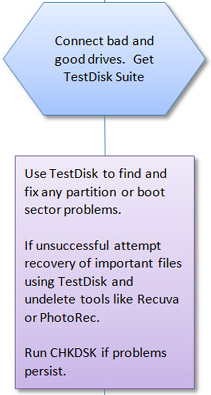
Repair Partition Table or Boot Sector
Download TestDisk and attempt to repair/recover lost or damaged partitions or boot sectors.
TestDisk Partition and Boot Sector Repair Tutorials
Another TestDisk Partition Repair/Recovery Tutorial
Undeleting deleted files.
Undeleting files with Recuva
Undeleting Files with TestDisk
Undeleting Files with PhotoRec (folder structure and filenames may be lost)
Repairing the filesystem with CHKDSK.
CHKDSK works very well at repairing Windows filesystems. There is a chance that using it will make some files unrecoverable that would have been recovered with the previously mentioned techniques.
CHKDSK Details at Technet
You do not want to write to a drive that you are trying to recover data from because it is possible to overwrite and destroy data that you want to recover.
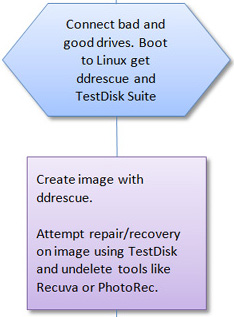
When there appears to be physical damage to the drive like bad sectors any attempts to recover data from it may make the damage worse before you can get all the data. In cases like this it is often best to use GNU ddrescue to make an exact image of the whole drive. It is included on the Parted Magic boot CD, here is the manual.
ddrescue helps you make a copy of a disk with errors while minimizing further damage to the disk. It does this by skipping every bad sector it comes across, noting where it exists and then coming back to it only after all of the good sectors have been copied. As long as you allow it to make a log file, you can repeatedly come back to the bad disk and try to recover the bad sectors. It also allows you to resume a copy from where it left off if there is a crash or a power failure during the imaging process.
ddrescue tries to make an exact copy of the disk. That way, you can recover deleted files and partitions from the copy just like you can recover them from the original.
Making an image with ddrescue
For this example, we will use a PartedMagic boot CD.
REQUIREMENTS:
- PartedMagic boot CD
- Computer with bad drive hooked up to it and a good drive that has enough free space to hold the entire bad drive plus 10% (if the bad drive is 500GB then the good drive needs at least 550GB of free space)
- Time to let the image process run. For example a damaged 500GB drive can take 10 or more hours to image this way.
STEPS:
- Identify the drives
- Mount the drive that the image and log file are going to be written to
- Run the ddrescue command
Identify the drives
With everything connected, boot the computer with the PartedMagic CD.
At the bottom of the screen near the left corner you will see a picture of a computer monitor. Click it to open a terminal window. In the terminal window type
fdisk -l
(that is fdisk SPACE DASH l as in Linux) and press ENTER
All of the connected drives and their partitions will be listed. You want to know what the name of the bad drive is (for our example /dev/sda) and what the name of the partition that you want to write to on the good drive is (for our example /dev/sdb1)
Mount the drive that the image and log file are going to be written to
Mount the good drive partition (called /media/sdb1 in our example) by clicking the 'mount devices' button which is on the lower left of the desktop (see picture)
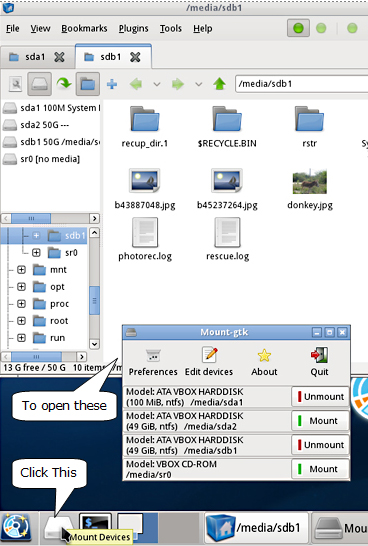
Click the button that says mount next to the good drive partition (called /media/sdb1 in our example). We only want to mount that one and not any of the others.
Run the ddrescue command
Now you can run the ddrescue command in the Terminal window. For our example it is...
ddrescue -r 3 /dev/sda /media/sdb1/image.dd /media/sdb1/rescuelog.log
-r 3 tells ddrescue to retry rescuing each bad sector 3 times before giving up on it.(-1 can be used to tell it to try infinite times)
/dev/sda is the bad drive that we are copying.
/media/sdb1/image.dd is the image file that we want to copy the bad drive to.
/media/sdb1/rescuelog.log is where we want to save our logfile.
When ddrescue is done then you will have the image in the file image.dd. It can be repaired and then put on a new drive (using ddrescue or dd) or mounted in Linux (using the mount command) or Windows (using a program like OSFMount) and treated like a regular drive. Before that you probably need to repair or recover files from it. Most repair/recovery tools will work with an image file.
Repair Partition Table or Boot Sector
Download TestDisk or use it in the Terminal in PartedMagic (it is included) and attempt to repair/recover lost or damaged partitions or boot sectors.
TestDisk Partition and Boot Sector Repair Tutorials
Another TestDisk Partition Repair/Recovery Tutorial
Undeleting deleted files.
Undeleting files with Recuva (requires the image file to be mounted in Windows with a program like OSFMount)
Undeleting Files with TestDisk
Undeleting Files with PhotoRec (folder structure and filenames may be lost)
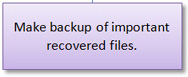
At this point it is important to verify that the recovered files are working and not corrupted and to make backup copies of them. You also need to decide whether or not you feel safe trusting the disk that you have repaired/recovered from or if the drive should be replaced.
Many people will keep their recovered files on the drive that they recovered them to and copy the ones they need or are most important to a new replacement drive. That way they have a backup of what they recovered.